
I remember the day I switched from two monitors to four. I was working as a freelance data analyst, juggling three client dashboards, a spreadsheet, a Slack window, and my email. I was Alt-Tabbing so fast I thought I would sprain my wrist. A colleague laughed and said, “Just go quad.” I resisted for months. Then I did it. Within two weeks, my output increased by nearly 40%. I am not exaggerating.
A 4 monitor setup is no longer a luxury reserved for Wall Street traders or Hollywood editors. In 2026, quad monitor configurations are powering the workstations of developers, streamers, business analysts, gamers, and remote workers worldwide. If you are still toggling between windows and wondering where your productivity went, this guide will change everything.
| Quick Summary: This guide covers everything from hardware requirements and monitor selection to step-by-step setup, software configuration, mounting solutions, troubleshooting, and cost planning. Whether you are a beginner or upgrading an existing multi-monitor rig, you will walk away with a complete, actionable plan. |
A 4 monitor setup, often called a quad monitor configuration, connects four display screens to a single computer. Each screen shows a different window, application, or view simultaneously. Unlike a dual monitor setup, a quad arrangement allows you to work across four distinct digital spaces without a single click of Alt-Tab.
The rise of remote work, crypto trading, video production, and data-heavy careers has pushed people toward more screen real estate. Monitors are cheaper than ever. A reliable 24-inch 1080p display now costs under $120 on Amazon. GPUs like the NVIDIA RTX 4060 and AMD Radeon RX 7600 natively support four or more outputs. The barriers are gone, and the benefits are massive.
If you fall into any of these categories, a 4 monitor setup is worth serious consideration:
- Stock traders and financial analysts who track multiple assets in real time
- Video editors and motion graphics artists managing timelines, previews, and assets
- Software developers who need a code editor, terminal, browser, and documentation open at once
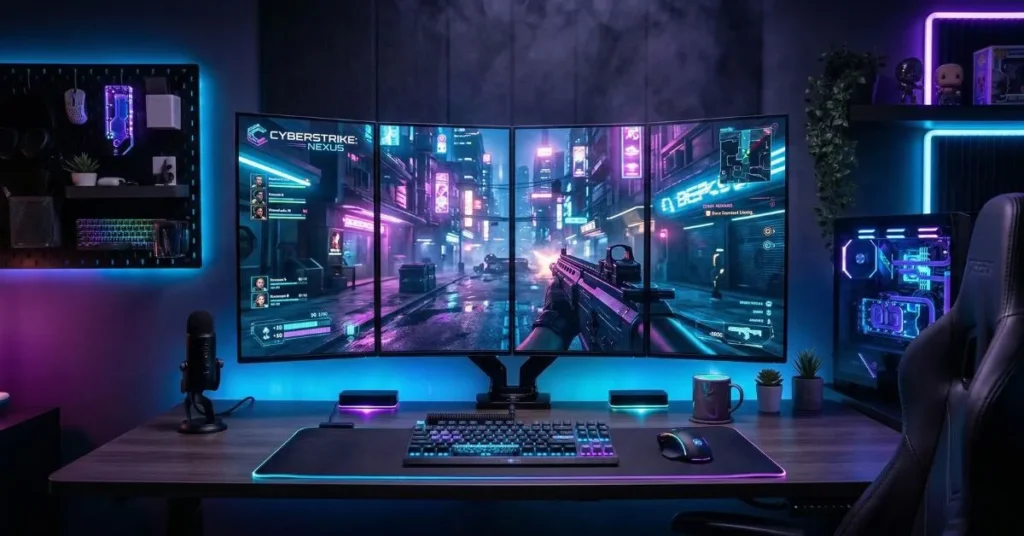
- Gamers who want immersive ultra-wide or surround gaming experiences
- Business analysts and data scientists handling dashboards and spreadsheets
- Remote workers managing multiple clients, projects, or communication channels
The most obvious benefit is space. With four monitors, you could display 16 browser tabs, three open applications, and your email all at the same time without overlapping a single window. I once calculated that my productive screen area went from 27 inches on a single monitor to over 96 inches of combined diagonal space on four 24-inch screens. That is not just more room. It is a different way of working.
Context switching is a productivity killer. Research from the University of California, Irvine found that it takes an average of 23 minutes to regain full focus after an interruption. Every time you minimize a window or hunt for a tab, you lose momentum. A quad monitor setup eliminates most of that friction. Your work is always visible, always accessible.
A Stanford study on knowledge workers found that multitasking with multiple screens improved task completion speed by up to 44% compared to single-screen setups. With four monitors, the gains compound. A video editor can have Premiere Pro on screen one, a reference video on screen two, project files on screen three, and client feedback notes on screen four. No digging. No switching. Just flow.
Counterintuitively, having more screens can actually reduce mental clutter. When everything has a permanent place, your brain stops trying to remember where things are. Screen one is always communication. Screen two is always your primary work surface. Screen three is always research. Screen four is always monitoring. That kind of structure builds habits and reduces cognitive load.
Different professions use four monitors in completely different ways. Here is a breakdown of the most common real-world applications:
| Profession | Screen 1 | Screen 2 | Screen 3 | Screen 4 |
| Stock Trader | Live charts | Order book | News feed | Portfolio tracker |
| Video Editor | Timeline / NLE | Preview monitor | Asset library | Client notes |
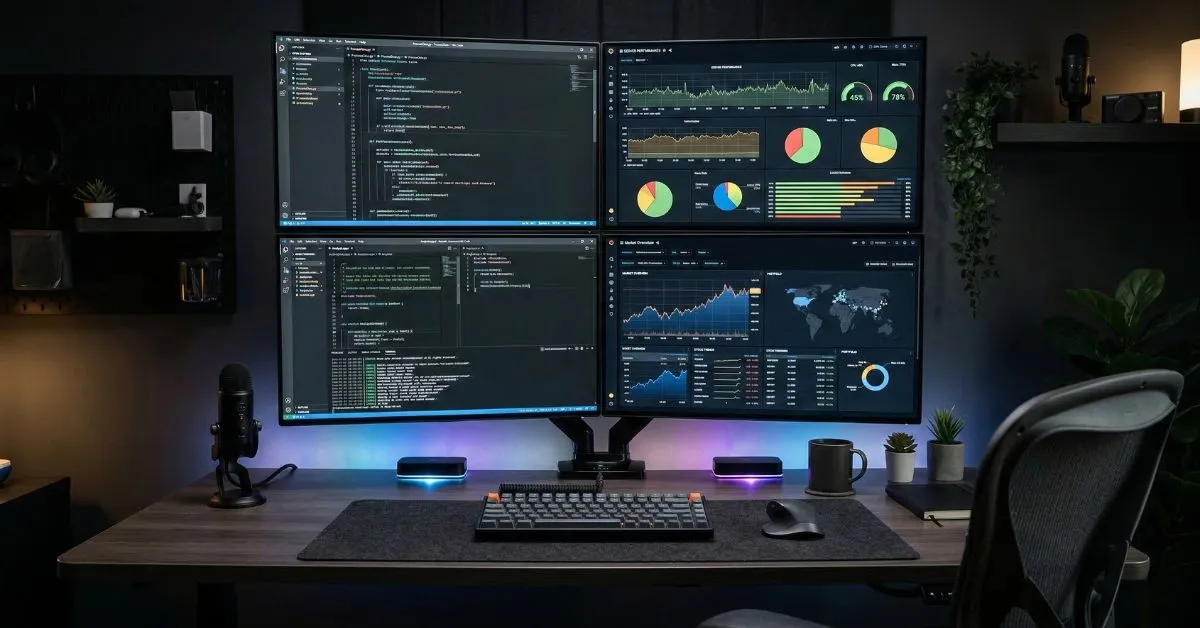
| Developer | Code editor | Terminal / CLI | Browser / docs | Debugger / logs |
| Data Analyst | Dashboard | Spreadsheet | Data pipeline | Email / Slack |
| Gamer (Surround) | Game (left) | Game (center) | Game (right) | Stream / overlay |
Each setup is tuned to a specific workflow. The point is that a quad monitor arrangement is not one-size-fits-all. You design it around how you actually work, and that makes it exponentially more powerful than any off-the-shelf solution.
This is where most people get surprised. Not every computer can run four monitors out of the box. Your GPU is the key variable. Most modern discrete GPUs from NVIDIA (RTX 3000 and 4000 series) and AMD (RX 6000 and 7000 series) support three to six displays natively. Intel Arc GPUs also support multi-monitor well.
The critical rule: check your GPU’s output port count before buying anything. A GPU with only two DisplayPort and one HDMI port supports a maximum of three displays, not four. You will need a GPU that has four or more usable outputs.
Recommended GPUs for a 4 monitor setup in 2026:
- NVIDIA RTX 4060 (4x outputs: 3x DisplayPort 1.4 + 1x HDMI 2.1) – around $299
- AMD Radeon RX 7700 XT (4x outputs: 3x DisplayPort 2.1 + 1x HDMI 2.1) – around $379
- NVIDIA RTX 4070 Super (4x outputs) – around $599, ideal for high-refresh quad setups
- AMD Radeon RX 6600 XT (budget option, 4 outputs) – around $199 used
Desktop setups have the most flexibility. You can drop in any GPU you want and add USB-C docking stations to expand output count. Laptops are trickier. Most laptops have one or two video outputs plus a USB-C/Thunderbolt port. Using a Thunderbolt 4 dock like the CalDigit TS4 or the OWC Thunderbolt Go Dock, you can drive multiple external displays, though performance depends heavily on your laptop’s Thunderbolt bandwidth. Mini PCs like the Intel NUC or ASUS PN series can support quad displays through Thunderbolt and HDMI combinations, but gaming-level performance is limited.
Here is what you need to know about ports: DisplayPort 1.4 and HDMI 2.1 are your go-to connections in 2026. DisplayPort is preferred for high refresh rates (144Hz+). HDMI 2.1 handles up to 4K 120Hz. Avoid VGA and DVI for new builds. USB-C with DisplayPort Alt Mode is excellent for clean cable runs on modern monitors like the LG UltraFine series. If your GPU does not have enough ports, a DisplayPort MST hub (such as the Club 3D CSV-7300 at around $89) can split one DisplayPort output into two or three, but this does limit bandwidth per screen.
You do not need four identical monitors, but it helps. Mixing monitor sizes and resolutions creates headaches when moving windows between screens. If budget allows, go with matching panels. The LG 27UL500-W (27-inch, 4K, IPS, around $349 each) is a popular choice for a clean quad setup. For budget builds, four units of the AOC C24G2 (24-inch, 1080p, 144Hz, VA panel, around $169 each) deliver excellent value.
Running four 4K monitors simultaneously demands serious GPU horsepower. Unless you are doing professional color work, 1440p (QHD) is the sweet spot in 2026. It offers sharp detail without destroying your GPU and CPU resources. For gaming or financial trading where speed matters, prioritize refresh rate (144Hz or 240Hz) over resolution. For creative work, prioritize color accuracy and resolution.
Thin-bezel monitors make a massive visual difference in a quad setup. Thick bezels between screens create jarring gaps that break immersion and make it harder to track content across displays. Monitors like the Dell UltraSharp U2722D (27-inch, QHD, 0.77mm bezel) or the ASUS ProArt PA278QV minimize those gaps and create a near-seamless display wall.
There are three primary layouts for four monitors:
- Horizontal row (4×1): Four monitors side by side. Great for ultrawide field-of-view gaming or trading. Requires a wide desk (at least 72 inches).
- Stacked 2×2 grid: Two monitors on top of two monitors. Excellent for productivity, as it mimics a large display wall. The most popular layout for developers and analysts.
- Primary + three flanking: One large central monitor with three smaller screens around it. Good for workflows where one task dominates and three others supplement it.
My personal recommendation is the 2×2 grid for pure productivity. I tried the horizontal row first and found myself straining my neck to look left and right. The grid keeps everything within comfortable eye and head movement range.
A standard 60-inch desk is too small for four monitors. You need a minimum of 72 inches for a horizontal row of 24-inch monitors. For a 2×2 grid, a 60-inch desk can work if you use monitor arms that allow you to position the upper tier higher and bring screens closer. L-shaped desks are a fantastic option for quad setups, placing two monitors on each arm of the L.
The top of any monitor should sit at or just below eye level. Your primary work monitors should be directly in front of you at arm’s length (roughly 60 to 80 cm from your face). Side monitors should be angled slightly inward (15 to 20 degrees) so you are not turning your neck more than 30 degrees. Ignoring ergonomics in a quad setup is a fast track to neck and shoulder problems. I speak from experience.
Here is the complete process from scratch, condensed into clear, actionable steps:
- Plan your monitor layout. Decide between 4×1 horizontal, 2×2 grid, or primary-plus-three arrangement based on your desk space and workflow.
- Choose your monitors. Match size, resolution, and refresh rate across all four displays where possible. Check for thin bezels if doing a grid layout.
- Check hardware compatibility. Confirm your GPU has four usable video outputs. If not, either upgrade your GPU or buy a DisplayPort MST hub.
- Select a mounting solution. Decide between a quad monitor stand, individual arms, or a wall mount. Freestanding quad stands (like the Vivo STAND-V004O) are easiest to install. Monitor arm systems (like the Ergotron LX series) offer the most flexibility.
- Position monitors on your desk or mount. For a 2×2 grid, set up the bottom two first at eye level, then position the top two. For a horizontal row, start from the center and work outward.
- Connect monitors to your GPU. Use DisplayPort for the primary monitors whenever possible. Reserve HDMI for a fourth display if needed. Label your cables.
- Configure display settings in your OS. Open Display Settings in Windows 11 or System Preferences in macOS. Arrange the virtual positions of your monitors to match their physical layout. Set each monitor’s resolution and refresh rate individually.
- Optimize your workflow. Assign specific applications or tasks to each screen. Use virtual desktop software or window management tools to lock down your layout.
Your mounting choice shapes the entire look and feel of your setup. The main options are:
- Quad monitor stands (freestanding): Simple to set up, no clamp or drilling required. The Vivo STAND-V004O supports four monitors up to 27 inches and costs around $89. Great for renters or beginners.
- Monitor arm systems: Individual arms like the Ergotron LX (around $149 each) or the budget-friendly Amazon Basics Premium Single Monitor Arm offer maximum positioning freedom. You can tilt, swivel, and adjust height independently on each screen.
- Wall mounts: The cleanest aesthetic. Mounts like the VideoSecu ML12B (around $25 per unit) let you flush-mount each monitor directly to the wall. This frees up desk space entirely but requires drilling and careful cable management.
Monitor arms are the gold standard for ergonomics. They let you pull screens forward when focused and push them back when you need desk space. They also make cable management dramatically cleaner by routing cables through their channel. For a serious quad setup, arms are worth the investment.
For a clamp-based quad stand, start by clamping the base to the rear edge of your desk, ensuring the desk thickness matches the clamp spec. Attach each monitor arm to the pole, then mount each display using the VESA adapter (most monitors are VESA 75×75 or 100×100). Run cables through the cable channels before fully tightening anything.
After mounting, sit in your normal working position and adjust each monitor from that seated vantage point. Do not adjust while standing. The center two monitors in a 2×2 grid should be directly in front of you. Avoid tilting screens more than 15 degrees backward, as this increases glare and strains your neck.
Windows 11 makes multi-monitor arrangement straightforward. Go to Settings > System > Display, and drag each monitor thumbnail into the correct physical position. Set your primary display (where your taskbar and app launches appear by default). macOS Ventura and later handle this in System Settings > Displays, with a similar drag-to-arrange interface.
These tools will transform how you work across four displays:
- DisplayFusion (Windows, $29): The best multi-monitor management tool available. Supports per-monitor taskbars, hotkey window movement, custom scripts, and wallpaper spanning.
- Microsoft PowerToys FancyZones (Windows, free): Define custom window snap zones on any screen. Absolutely game-changing for a quad layout.
- Magnet (macOS, $7.99): Drag windows to screen edges and corners to snap them into predefined zones. Essential for macOS quad users.
- ActualMultipleMonitors (Windows, $49.95): Full-featured multi-monitor manager with virtual desktops per screen and advanced window rules.
If you want to treat multiple monitors as a single large display for gaming or presentation purposes, NVIDIA Surround (for RTX users) and AMD Eyefinity (for Radeon users) both offer native multi-display spanning. Set up Surround or Eyefinity through your GPU’s control panel. Keep in mind that most productivity applications do not handle spanned displays well. Spanning is best reserved for gaming or specific creative workflows.
Assign each monitor a permanent role and stick to it. Screen one: communications (email, Slack, Teams). Screen two: primary work application. Screen three: reference material or secondary work. Screen four: monitoring tools, media, or secondary applications. After two weeks, your muscle memory will navigate the setup automatically.
On a standard desktop with a capable GPU (four outputs), connect each monitor to its own dedicated port. Mix DisplayPort and HDMI as needed, but avoid active adapters where possible as they can introduce lag. Boot into Windows, open Display Settings, and arrange your monitors. If your GPU only has three outputs, a DisplayPort 1.4 MST hub adds the fourth display.
Laptops require a Thunderbolt 4 or USB4 dock for reliable quad display support. The CalDigit TS4 Thunderbolt 4 Dock (around $249) supports up to four displays through its Thunderbolt and DisplayPort outputs. Connect the dock to your laptop via a single Thunderbolt cable, then connect all four monitors to the dock. Some premium gaming laptops also support a combination of built-in HDMI, USB-C video, and docking station outputs.
For gaming with NVIDIA Surround, open NVIDIA Control Panel > Configure Surround and PhysX > Span displays with Surround. Select your four monitors and configure the bezel correction settings so the image aligns correctly across all screens. For AMD, open AMD Software: Adrenalin Edition > Gaming > AMD Eyefinity. The process is similar and produces a single large virtual resolution that games can use as a native display target.
Monitor not detected: First, try a different cable and port. If the monitor still does not appear, check Device Manager in Windows for display adapters and update GPU drivers. Disconnect all monitors and reconnect one at a time to isolate the problem display.
Compatibility problems: Some older GPUs cannot drive more than three displays simultaneously due to firmware limitations. Check your GPU manufacturer’s website for the exact maximum display count. If you are hitting a GPU limit, a USB-C to DisplayPort adapter using DisplayLink technology (like the Plugable USB-C Dual 4K Display Adapter at around $99) can add additional displays using USB bandwidth instead of GPU outputs.
Resolution mismatch: If one monitor appears blurry or in the wrong resolution, right-click the desktop, select Display Settings, click on the affected monitor, and manually set its native resolution. Ensure your cable supports the resolution you are targeting. A standard HDMI 1.4 cable cannot push 4K 60Hz.
Flickering or screen tearing: Tearing usually means VSync is disabled. Enable VSync in your game or GPU control panel for gaming. For productivity, flickering often points to a cable issue or an incompatible refresh rate. Try reducing the refresh rate from 144Hz to 60Hz temporarily to diagnose.
Lag or GPU overload: Running four 4K monitors at high refresh rates will tax any GPU. If you experience sluggish performance, reduce resolution on secondary monitors (set them to 1080p) or cap refresh rates. Use Task Manager or GPU-Z to monitor VRAM usage. If VRAM is constantly above 90%, it is time for a GPU upgrade.
Cable management: Plan your cable runs before securing anything permanently. Use cable sleeves, velcro ties, and under-desk cable trays to keep the desk clean. Label both ends of every cable with a small tag. Future you will be grateful.
Heat and power management: Four monitors draw significant power. Budget around 20 to 30 watts per monitor. A quad setup with a mid-range GPU and peripherals can draw 400 to 600 watts under load. Ensure your power supply (PSU) has adequate headroom. Use a power strip with surge protection and check that your office circuit can handle the load.
Ergonomic problems: Neck and eye strain are the most common complaints in new quad setups. Recalibrate your monitor heights and distances if you notice discomfort. Take the 20-20-20 rule seriously: every 20 minutes, look at something 20 feet away for 20 seconds.
Here is a realistic cost breakdown for two distinct quad monitor configurations in 2026:
| Component | Budget Build (~$800) | Premium Build (~$2,800) |
| 4x Monitors | 4x AOC C24G2 @ $169 = $676 | 4x LG 27GP950-B @ $499 = $1,996 |
| GPU (if needed) | RX 6600 XT @ $199 | RTX 4070 Super @ $599 |
| Mounting | Vivo Quad Stand @ $89 | 4x Ergotron LX Arms @ $149 = $596 |
| Cables | Generic DP/HDMI set @ $30 | Belkin/Cable Matters @ $80 |
| Total (approx.) | $994 | $3,271 |
If you have to prioritize, spend on your GPU first. A weak GPU bottlenecks everything else. Then invest in quality monitors. Cheap TN panels will make you miserable eight hours a day. Mounting can be done on a budget initially and upgraded later. Cables are cables as long as they meet the spec for your resolution and refresh rate.
Clean your monitors weekly with a microfiber cloth and screen-safe cleaner. Dust the rear of monitors and inside monitor arm channels quarterly. Use a compressed air can to clear dust from VESA mounting holes and cable ports. A clean setup performs better and lasts longer.
Keep your GPU drivers current. NVIDIA GeForce Experience and AMD Adrenalin both offer automatic driver update notifications. Out-of-date GPU drivers are the single most common cause of multi-monitor glitches, resolution resets after sleep, and display detection failures.
Enable hardware-accelerated GPU scheduling in Windows 11 for smoother multi-monitor performance. Set your monitors to turn off after 15 minutes of inactivity to reduce wear on panels. Use a UPS (uninterruptible power supply) to protect against power surges that can damage multiple displays simultaneously.
Quad monitor mounts typically use a central pole or bracket that attaches to a desk edge via a C-clamp or grommet. Individual arms branch off the central pole, each holding one monitor via a VESA mounting plate. The arms are adjustable for height, tilt, and swivel. Some use a single gas-piston mechanism per arm for effortless repositioning.
Most quad stands have a per-arm weight rating of 14 to 22 pounds. Most 27-inch monitors weigh 12 to 18 pounds with their stands removed. Always check the VESA mount weight rating against your monitor’s spec sheet. For larger or heavier displays (32 inches and above), choose heavy-duty arms like the Ergotron HX (rated to 42 pounds per arm).
Any monitor with VESA mounting holes (75x75mm or 100x100mm) is compatible with monitor arms and stands. Nearly all modern monitors have VESA mounts. The only exceptions are some budget monitors with fixed, non-removable stands. Check the spec sheet or the back of the monitor for VESA mount holes before purchasing.
In Windows 11, open Display Settings and drag the monitor thumbnails to rearrange their logical positions. To adjust resolution or refresh rate for a specific monitor, click on that monitor’s thumbnail in the settings panel and modify its individual display properties. On macOS, go to System Settings > Displays and use the drag interface. Physical adjustments are made directly on the monitor arm or stand.
A 4 monitor setup is one of those rare productivity investments that pays for itself within weeks. Whether you are trading markets, cutting video, writing code, or running a business, having four screens changes not just how much work you can do, but how you think about your workflow.
The setup process is more straightforward than most people expect. Pick a capable GPU, choose matching monitors with thin bezels, mount them at eye level, connect the cables, configure your display arrangement in Windows or macOS, and assign each screen a permanent purpose. That is really all there is to it.
Anyone who spends more than 6 hours a day in front of a computer and regularly needs more than two applications visible simultaneously is a strong candidate. If you are still toggling between windows, losing time searching for tabs, or feeling frustrated by your current setup, a quad monitor configuration will feel like upgrading from a studio apartment to a four-room house. Same brain. Four times the space to think.
- Check your GPU for four output ports before buying anything
- Match your monitors for size and resolution to avoid layout headaches
- Use a 2×2 grid layout for maximum productivity ergonomics
- Invest in DisplayFusion or PowerToys FancyZones for workflow management
- Assign each screen a permanent role and let muscle memory take over
- Budget $800 to $1,200 for a solid beginner quad setup in 2026
| Final thought: The best 4 monitor setup is the one you actually build. Stop overthinking the perfect configuration and start with what you can afford today. You can always add a better GPU or upgrade your monitors later. The productivity gains begin on day one. |
Have questions about your specific 4 monitor setup? Drop them in the comments below. I read every single one.